Posts

#IdahoFightingCOVID

Image
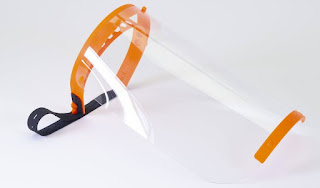
I'm going to keep this super-short, no time for fancy introductions. As COVID19 is taking hold, our supply chain isn't strong enough to keep our medical and essential workers supplied with personal protective equipment. Over in Czechia, the company that I buy my 3D printers from worked with their government healthcare organizations to create a 3D-printed face shield . It's two plastic printed parts, a plastic shield, and a piece of elastic. It's highly optimized for 3D printing, and it has been tested by medical professionals all over the world. Over in Huntsville, Alabama, the community created an organization to 3D print, collect, sanitize, and deliver face shields to the people who need them. As a side effect, we have a template to follow to do the same here in Idaho. Everything that is happening in this video? We're doing it. BSU led the charge, and while I don't know how many face shields they've delivered, I think it's

Managing Steel Sheets on Prusa 3D Printers

Image
The Prusa MK3, MK3S, and MINI all use removable steel sheets as a printing surface. Removable sheets have several advantages over their older non-removable predecessors: by removing and flexing the sheet inwards or outwards, parts pop off much more easily, and when the sheet wears out, it is easily replaced. They're held down to the heat plate with rare earth magnets, so they don't move around during prints but are very easy to swap. Sheets come in two flavors: smooth PEI sheets, and textured power-coated sheets (I personally use the smooth sheets for PLA, and the textured sheets for PETG). Since I basically manufacture WLAN Pi cases on my small farm of three Prusa MK3S printers, I have several sheets running around (three textured, one smooth). To be clear, this is Joseph Prusa's print farm, not mine, but it was cool to visit with one of my printed WLAN Pi cases. One natural attribute of spring sheets is that they vary slightly in thickness, so they each require a

Does the Apple Airport Extreme use VLANs?

Image
Short answer: yep! Long answer: It's no secret that I'm a huge fan of the Apple AirPort Extreme . Whenever friends and family have Wi-Fi problems at home, I get on Craigslist and buy a used Apple AirPort Extreme for them. I love their high-quality 3x3 radios, simplicity, and reliability. In a few cases, I've set up more than one at a time. If we're lucky enough to have some ethernet in the house, I might use two or even three AirPort Extremes to provide coverage everywhere. One as a router, and the other one or two as just "access points". Apple calls this "extending with Ethernet" in the AirPort Utility. One thing I've always wondered about: how does the AirPort Extreme separate guest network and "internal" network traffic? I figured that it was likely to be VLANs, but without a PCAP, I couldn't be sure. I picked up a couple of A1354's (that's the 4th-generation, 2009 version with 3 spatial streams) to deploy for

The WLAN Pi Handheld Case

Image
I'm a huge fan of the WLAN Pi , but who in the Wi-Fi community isn't? Whether you're using it as an iPerf throughput testing endpoint, performing wireless packet captures from it, using as a remote Wi-Fi scanning sensor, or capturing client device capabilities, the WLAN Pi is quickly becoming the community-driven Swiss Army Knife of Wi-Fi engineering. The only real problem with the WLAN Pi is its formfactor. When you arrive on site, you need to pull the Pi itself out of your bag, connect a Wi-Fi adapter, power it via USB, then  you can start using it. Now don't get me wrong, the modularity of the WLAN Pi is a really good thing , but it does make it feel less like a tool, and more like a kit. On the other end of the spectrum is the NetAlly LinkSprinter, which you can just toss in your bag when you're done using it. No disassembly required. That's where the WLAN Pi Handheld Case comes in! Keith Parsons, who among many things, teaches Wi-Fi troubleshooting cour

Enabling Zoom on macOS

Image
At WLPC in 2018, I presented on packet analysis, or spectrum analysis, or something... but nobody cared, because during the presentation, I used the keyboard zoom feature in macOS to zoom in on areas of interest during live demos. That really grabbed a lot of people's attention! I've received a lot of questions about how I do it, so here's how! 1. Open System Preferences (the fastest way is to press command  + space , type Preferences, and hit enter) 2. Open Accessibility 3. Go to Zoom 4. Check Use scroll gesture with modifier keys to zoom 5. To zoom in: Hold down the control  button, and scroll down either using two-finger scroll on your trackpad, one-finger scroll on your magic mouse, or scroll with whatever mouse you have 6. To zoom out: Hold down the control  button, and scroll up

Cellular Failover with an Android Phone and Raspberry Pi

Image
The great CenturyLink outage of late 2018 is under way. At the time of this writing, we're 16.5 hours in, and I'm tired of using my Android phone as a Wi-Fi hotspot. I want my network back up. Fortunately, I have some tools to work with. I have a spare Android phone complete with an unlimited data plan (T-mobile ran a 3rd line for free promo a couple years ago) and a spare Raspberry Pi (seriously who doesn't have several of those kicking around). The idea here is that we can use the Raspberry Pi to turn that USB cell phone tether into ethernet, so our router can treat it basically like a modem. Now in my setup, I have a "WAN2" port on my Ubiquiti UniFi Secure Gateway. If WAN1 goes down, the USG will automatically flop over to WAN2. You might have do to "manual failover" when your ISP goes down, but shoot, even my CenturyLink DSL modem has a configurable WAN2 port, so it all depends on your setup. So let's get to work, and get some packets flowi

Aliasing MAC Addresses with Wireshark

Image
I love Wireshark, but one thing is for sure: tracking 802.11 conversations with my human brain is difficult. Coloring rules help, but I find it very difficult to remember which MAC address is which wireless station. Fortunately, Wireshark has the ability to alias IP and MAC addresses! These are defined in the "ethers" file. You should be able to do nearly the same thing on Windows, but here's how to do it on macOS. 1. Open a terminal, and run: nano ~/Users/your_username/.config/wireshark/ethers 2. Define the MAC address and the desired alias in the file. Separate the MAC and alias with any number of spaces. Aliases themselves can't contain spaces. ab:cd:ef:12:34:56 (AP)Aruba205H 12:34:56:ab:cd:ef (Client)Nokia6.1 ab:12:ef:cd:34:56 (Client)MacBookPro Tip: I like to lead with either (AP) or (Client) so I can immediately tell which side is talking. 3. Save the file by pressing Ctrl+X , then Y  for yes, then Enter . 4. Restart Wiresh